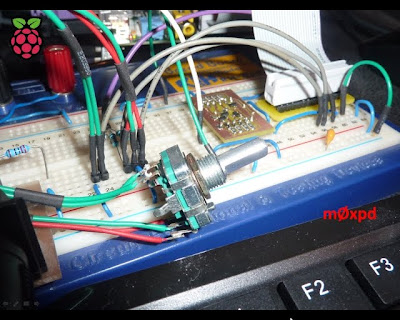
I've been playing with an incremental rotary encoder on the Raspberry Pi - for no better reason than the mountaineers' lame excuse "because it's there"...
![]()
The incremental rotary encoder produces two quadrature square waves (as you can learn by reading any of a number of descriptions including this one). By detecting the relative phase of the square waves, you can figure the direction of rotation and (if you are really keen to encode angular velocity accurately) the speed of rotation too.
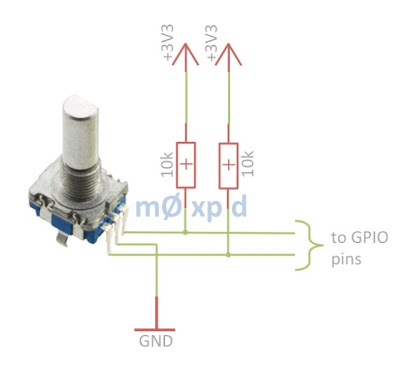
I settled for a clumsy attempt to decode direction alone, using this circuit...
![]()
Of course, you need some code too - I wrote the following simple demonstration in Python. It detects positive-going transitions on "PinA" and looks at the state of PinB during these transition events to figure the direction in which the encoder has been moved.
After the fun-and-games with the MIDI controller, I'm really excited about object-oriented software for the RPi, so here's an elaboration which includes a class for Rotary Encoders, connected to any two GPIO pins on the RPi. There's also facility to read a push-button (which some encoders - including mine - feature).
Here's a screen shot showing me running the second program ...
![]()
The code works - but only just...
It is important to sample a rotary encoder at a sufficiently high sample rate to avoid aliasing which - in this case - results in missed "moves" or even moves of incorrect direction.
I cannot get the RPi to sample fast enough to guarantee that every movement is perfectly observed, whether in the "while" loop seen in the programs above, or in a tkinter ".after()" command with a delay argument of 1 millisecond. What's worse, the little graph of processor utilisation at the bottom right of the RPi desktop (like the PC's "Task Manager" or the Mac's "Activity Monitor") reveals that the processor is working hard to sample the encoder at this rate (as you can just see in the screenshot above). I don't know enough about RPi to know if an interrupt-driven approach, such as would be easy and obvious on a PIC, is possible or desirable.
Having said all that, the code above works well enough to let me add a "knob" to my simple RPi MIDI controller, making it much more user-friendly than the original mouse drag-able sliders.
Next, I hope to use the rotary encoder to control the frequency of the DDS generator module from eBay that's just arrived on my doormat - watch this space!
...-.- de m0xpd
I settled for a clumsy attempt to decode direction alone, using this circuit...
Of course, you need some code too - I wrote the following simple demonstration in Python. It detects positive-going transitions on "PinA" and looks at the state of PinB during these transition events to figure the direction in which the encoder has been moved.
After the fun-and-games with the MIDI controller, I'm really excited about object-oriented software for the RPi, so here's an elaboration which includes a class for Rotary Encoders, connected to any two GPIO pins on the RPi. There's also facility to read a push-button (which some encoders - including mine - feature).
Here's a screen shot showing me running the second program ...

The code works - but only just...
It is important to sample a rotary encoder at a sufficiently high sample rate to avoid aliasing which - in this case - results in missed "moves" or even moves of incorrect direction.
I cannot get the RPi to sample fast enough to guarantee that every movement is perfectly observed, whether in the "while" loop seen in the programs above, or in a tkinter ".after()" command with a delay argument of 1 millisecond. What's worse, the little graph of processor utilisation at the bottom right of the RPi desktop (like the PC's "Task Manager" or the Mac's "Activity Monitor") reveals that the processor is working hard to sample the encoder at this rate (as you can just see in the screenshot above). I don't know enough about RPi to know if an interrupt-driven approach, such as would be easy and obvious on a PIC, is possible or desirable.
Having said all that, the code above works well enough to let me add a "knob" to my simple RPi MIDI controller, making it much more user-friendly than the original mouse drag-able sliders.
Next, I hope to use the rotary encoder to control the frequency of the DDS generator module from eBay that's just arrived on my doormat - watch this space!
...-.- de m0xpd