This Christmas, along with other fine gifts, Santa gave me a Raspberry Pi.
![]()
In this brief lull in hostilities between Christmas and New year I've stolen a couple of hours to play with my new toy. I have to say I'm impressed!
It has been a pretty steep learning curve, because I didn't really know much about the whole Linux universe when I started. I've used a MAC at work for the past couple of years - but MAC encourages such a superficial engagement with the computer that you don't need to know anything about the nuts and bolts!
I was greatly helped by another present from Santa - the Raspberry Pi User Guide by Upton and Halfacree. That has been a good little book, which gave me a useful kick start. However, I didn't want just to light an LED or detect a button push as my baptism on the GPIO - so I decided to make a keyer...
![]()
I approached the project with a little trepidation, because Eben says in the User's Guide referenced above ...
That bothered me, because it was exactly the availability of the GPIO interface that attracted me to the Pi in the first place, promising a convergence between real computing and the PIC-based fun-and-games I've been describing on these pages. I hoped that the "real-time" warning (repeated on the Project Home Page for the GPIO module I used) wasn't going to threaten that promised convergence. Yes - I know that a morse keyer isn't exactly pushing the boundaries of real-time operation - but I also know from experience that a surprisingly small latency (of only 80 milliseconds) in a keyer is enough to make operation difficult.
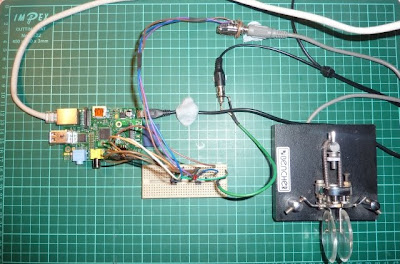
Here's the circuit I hooked up...
![]()
You can see that three GPIO lines are used for interface; one for each of the paddle's switches and one to key the transmitter (through the open collector). I started development with some little momentary action push-button switches which I left on the breadboard in parallel with the interface to the twin paddle, as you see in this picture...
![]()
Talking of interfacing to the RPi GPIO lines, I really like this solution - I shall have to buy one or make a copy!
Before we go on to describe the code, a warning. Remember that I started this knowing NOTHING about programming in Python, so what follows is an account of how something can be done, rather than how something should be done.
My code uses a Python module to access the GPIO port and I chose to use the module recommended in the User's Guide.
The code is seen in the windows below - I have been connecting to the Pi through SSH using the PuTTY SSH Client . The windows below show the Keyer program listed in the Nano editor. You don't have to work in this rather spartan way - I chose to do so in order to learn more about console/terminal interaction with Linux.
The first window shows some configuration stuff and some initial functions...
![]()
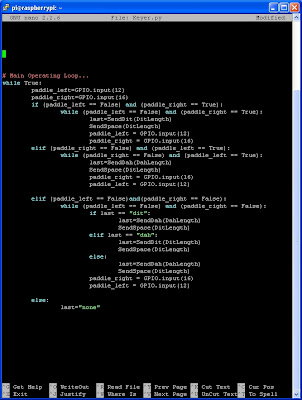
The second window shows the main operating "loop" of the code...
![]()
I don't know just how bad a piece of Python the above code is. All I know is that I learned a bunch from writing it and that the resulting keyer works perfectly. Having said that, it is utterly pointless as I already have my own Keyer solution and its more Rhythmically sophisticated derivative!
...-.- de m0xpd
Update:
Perhaps this wasn't just a Raspberry Pi learning exercise - it could be a tool for wireless telegraphy. To prove it (to myself, at least), I just used the keyer and my Funster Plus rig (which ironically already has a keyer built into it!) to have a quick QSO with Wally, operating the GB0YAM station on 40m at the Yorkshire Air Museum. Reminded me just how sloppy my CW has become!

In this brief lull in hostilities between Christmas and New year I've stolen a couple of hours to play with my new toy. I have to say I'm impressed!
It has been a pretty steep learning curve, because I didn't really know much about the whole Linux universe when I started. I've used a MAC at work for the past couple of years - but MAC encourages such a superficial engagement with the computer that you don't need to know anything about the nuts and bolts!
I was greatly helped by another present from Santa - the Raspberry Pi User Guide by Upton and Halfacree. That has been a good little book, which gave me a useful kick start. However, I didn't want just to light an LED or detect a button push as my baptism on the GPIO - so I decided to make a keyer...
I approached the project with a little trepidation, because Eben says in the User's Guide referenced above ...
"If true real-time operation is required for your project, the Pi may be a bad choice. Instead, consider using a microcontroller platform such as the popular open-source Arduino..."
That bothered me, because it was exactly the availability of the GPIO interface that attracted me to the Pi in the first place, promising a convergence between real computing and the PIC-based fun-and-games I've been describing on these pages. I hoped that the "real-time" warning (repeated on the Project Home Page for the GPIO module I used) wasn't going to threaten that promised convergence. Yes - I know that a morse keyer isn't exactly pushing the boundaries of real-time operation - but I also know from experience that a surprisingly small latency (of only 80 milliseconds) in a keyer is enough to make operation difficult.
Here's the circuit I hooked up...

You can see that three GPIO lines are used for interface; one for each of the paddle's switches and one to key the transmitter (through the open collector). I started development with some little momentary action push-button switches which I left on the breadboard in parallel with the interface to the twin paddle, as you see in this picture...
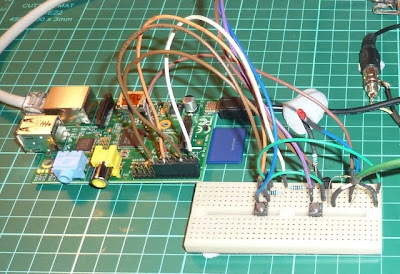
Talking of interfacing to the RPi GPIO lines, I really like this solution - I shall have to buy one or make a copy!
Before we go on to describe the code, a warning. Remember that I started this knowing NOTHING about programming in Python, so what follows is an account of how something can be done, rather than how something should be done.
My code uses a Python module to access the GPIO port and I chose to use the module recommended in the User's Guide.
The code is seen in the windows below - I have been connecting to the Pi through SSH using the PuTTY SSH Client . The windows below show the Keyer program listed in the Nano editor. You don't have to work in this rather spartan way - I chose to do so in order to learn more about console/terminal interaction with Linux.
The first window shows some configuration stuff and some initial functions...

The second window shows the main operating "loop" of the code...
I don't know just how bad a piece of Python the above code is. All I know is that I learned a bunch from writing it and that the resulting keyer works perfectly. Having said that, it is utterly pointless as I already have my own Keyer solution and its more Rhythmically sophisticated derivative!
...-.- de m0xpd
Update:
Perhaps this wasn't just a Raspberry Pi learning exercise - it could be a tool for wireless telegraphy. To prove it (to myself, at least), I just used the keyer and my Funster Plus rig (which ironically already has a keyer built into it!) to have a quick QSO with Wally, operating the GB0YAM station on 40m at the Yorkshire Air Museum. Reminded me just how sloppy my CW has become!